

This document explains how to import KokoonDesign products into Prestashop CSM, version 1.7.7.1
PREREQUISITES
CHANGING THE UPLOAD_MAX_FILESIZE VALUE
For Prestashop to import files of more than 2MB, as is the case with the KokoonDesign catalog, you’ll need to increase the “upload_max_filesize” value located in your php.ini file on your web server.
This value can be changed in the command line directly on your server by editing the php.ini file, or if your server is equipped with a control panel such as Cpanel, Directadmin or similar, this value will be found in the PHP parameters of your configuration.
You’ll get the following result in Prestashop’s import interface:
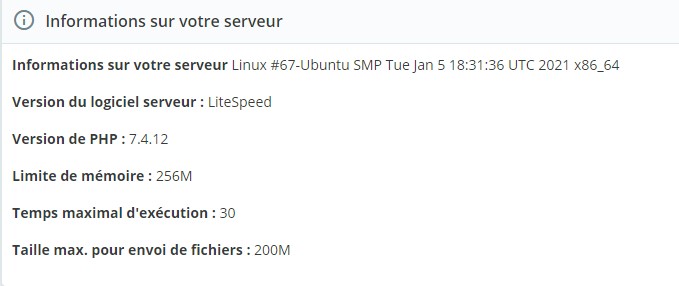
This screenshot shows the parameters that have been used in this documentation. We recommended that you apply them on your side to ensure a smooth import process.
CSV FILE LAYOUT
There are two CSV files in Prestashop. The first one contains the categories you’ll need to import beforehand.
The second CSV file for Prestashop contains 56 fields, but only 9 of them are required. The others are product attributes that you can choose to add (or not), depending on the products you’re choosing to integrate.
|
N° |
Name |
Comments |
Required |
|
1 |
ID |
This ID is automatically generated by Prestashop. |
yes |
|
2 |
Reference |
This is the product number which also serves as the SKU. |
yes |
|
3 |
EAN |
no |
|
|
4 |
KOKOON name |
yes |
|
|
5 |
Short description |
yes |
|
|
6 |
Product description |
yes |
|
|
7 |
Lenght in CM |
no |
|
|
8 |
Width in CM |
no |
|
|
9 |
Height in CM |
no |
|
|
10 |
Material – structured info |
no |
|
|
11 |
Secondary Material – structured info |
no |
|
|
12 |
Main colour |
no |
|
|
13 |
Secondary colour |
no |
|
|
14 |
Product Wheight |
no |
|
|
15 |
Seat padding |
no |
|
|
16 |
Back padding |
no |
|
|
17 |
Armrest height |
no |
|
|
18 |
Back width |
no |
|
|
19 |
Back height |
no |
|
|
20 |
Seat width |
no |
|
|
21 |
Seat depth |
no |
|
|
22 |
Adjustable in height? |
no |
|
|
23 |
Sitting height |
no |
|
|
24 |
Base diameter |
no |
|
|
25 |
Stackable |
no |
|
|
26 |
Maximum sustainable wheight |
no |
|
|
27 |
360° Rotation? |
no |
|
|
28 |
Outside use? |
no |
|
|
29 |
Rocking back |
no |
|
|
30 |
Headrest adjustable in height? |
no |
|
|
31 |
Number of bulbs |
no |
|
|
32 |
Watts per bulb |
no |
|
|
33 |
dimmable? |
no |
|
|
34 |
Bulb fitting type |
no |
|
|
35 |
Hang cable max lenght in cm |
no |
|
|
36 |
Hang cable adjustable in height? |
no |
|
|
37 |
Material description |
no |
|
|
38 |
Structure material |
no |
|
|
39 |
Drawer material |
no |
|
|
40 |
Up shelf material |
no |
|
|
41 |
Down shelf material |
no |
|
|
42 |
Lamp Shade material |
no |
|
|
43 |
Base material |
no |
|
|
44 |
Sphere material |
no |
|
|
45 |
Ceiling mount material |
no |
|
|
46 |
Feet material |
no |
|
|
47 |
Tablet material |
no |
|
|
48 |
Tablet lenght |
no |
|
|
49 |
Tablet Width |
no |
|
|
50 |
Tablet diameter |
no |
|
|
51 |
To be assembled? 1=No 2=Yes |
no |
|
|
52 |
EU Custom code |
no |
|
|
53 |
category |
yes |
|
|
54 |
pictures url |
This is the list of images presented on the KokoonDesign server |
yes |
|
55 |
Price |
Set to 50.00 by default |
yes |
|
56 |
Quantity |
Set to 100 by default |
yes |
IMPORT PROCEDURE
IMPORTING THE CATEGORIES
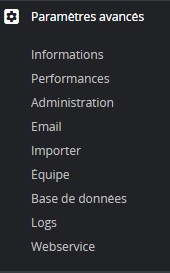
To begin the import process you’ll need to go to the administration interface of your Prestashop site and click on “Advanced Settings” > “Import” in the menu on the left.
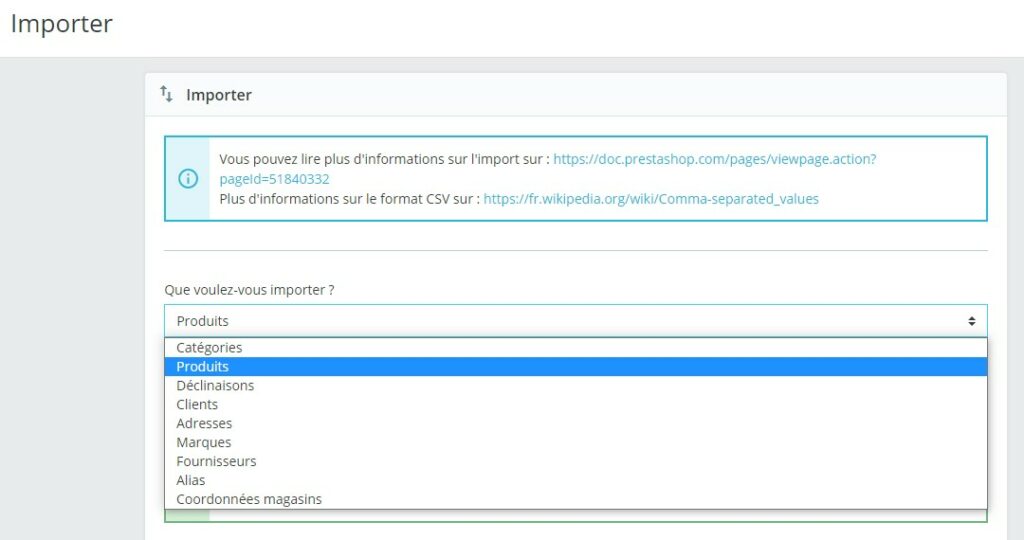
You’ll first import the “cat kook.csv” file, and in the import window, you’ll select “Categories” from the drop-down menu.
Separators for this file are “;”.
You can then leave the other default values and click on “Next step”.

In the next step, we’ll map the fields with Prestashop’s native fields.
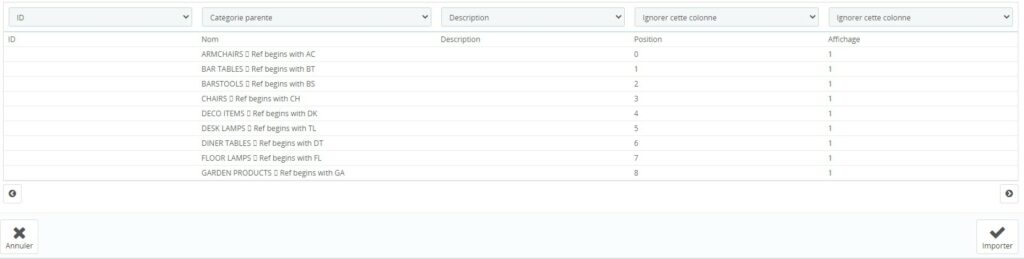
You can map the name with the name, the description with the description, and then you can select the “Ignore this column” for ID, position and display.
Once they’re in a database in the back end, you can control their display by creating, for example, a parent category called “furniture” and then placing all or some categories under this new The organisation of the back end remains your choice.
IMPORTING THE PRODUCTS
We’ll then import the products using the “prestashop_final_csv_fr.csv” file.
We’ll repeat the same process as in the previous step, except we’ll select different separators.
We’ll use “#” for the field separator and “,” for the multi-value field separator.
The KokoonDesign catalog, having a description field with characters that can themselves serve as delimiters, requires the use of less common delimiters.
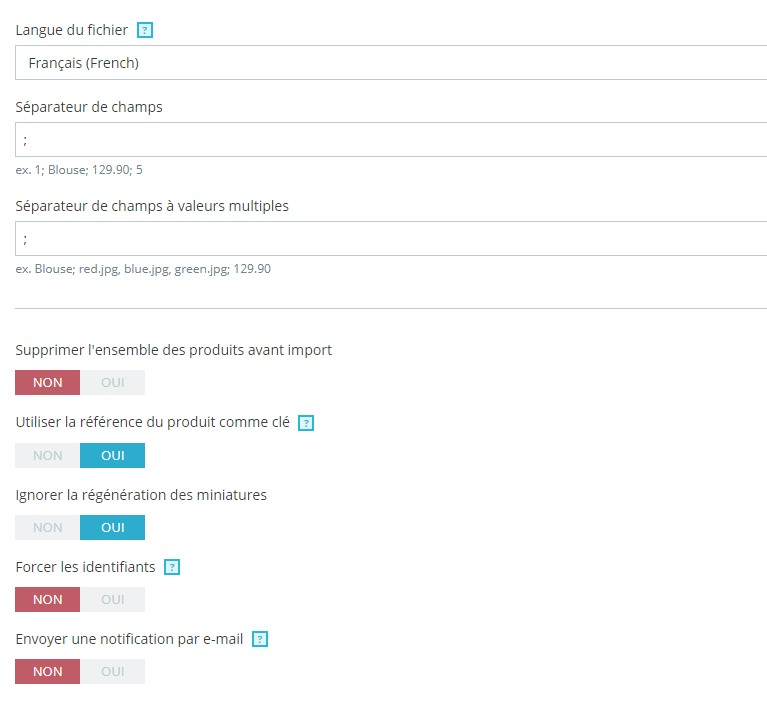
It’s up to you to select the values of your choice according to what’s already on your site (or not).
Performing a backup before proceeding is strongly recommended.
You can then click on the “Next Step” button
During importation, you’ll only encounter 6 errors when importing 6 images.
These errors can be ignored as they relate to images of 0kb.
These images are therefore not imported and will generate an error..
These images are in galleries with other images for the same product. This will, in no way, interfere with the graphic design of your site.
Once the procedure is complete, you can find your products in the back end with their respective images and the attributes you’ve chosen.
It’s then up to you to organise them so they appear on the front end of your site.